Overview
This page contains two primary helps: an example of creating a new view from scratch and a quick guide for common questions and information. If you decide to not do the example of creating the view, make sure to at least read the introduction.
Introduction
Before we create a new view several concepts about the way views are rendered on byui.edu need to be understood. First is how byui.edu uses layouts. There are three primary views used as layouts that render the items that are on every page of the site. The first of these three is: /DSS_Preview/Views/Shared/_MainLayout.cshtml
This is the root view of the site. It renders components that are common to every page on byui.edu, for example the footer. It also decides between which of the following sub-views to use in rendering the current page: /DSS_Preview/Views/Shared/_Layout.cshtml /DSS_Preview/Views/Shared/_ResponsiveLayout.cshtml
_Layout is used to render non-responsive pages. It loads the styles legacymain.css rather than main_new.css which is used by _ResponsiveLayout to render Bootstrap and other responsive components.
The decision of which layout to use is made on line 11 of _MainLayout
		if (Model.GetElementValue("IsResponsive").Equals("true") || _Functions.isDefaultResponsive(Model.ViewName)) {
			Layout = "~/Views/Shared/_ResponsiveLayout.cshtml";
		}
To see how
After _MainLayout and either _Layout or _ResponsiveLayout are rendered, the page type-specific view (i.e. Content, AcademicHome, etc.) is rendered.
The following diagram shows how byui.edu uses layouts:
Page Type-Specific Views
Cookbook Example
To demonstrate how to create a page type-specific view from scratch we will walk through an example of creating a cookbook website. This site will simply render a dynamic list of recipes which can be clicked on to view more information.
We will start by breaking the site up into any modules that make sense. In addition to our primary cookbook view we can creat component views and secondary views. We want our cookbook view to generate a list of recipes by simply looking for any recipe pages in a user-specified folder within Ingeniux. For our cookbook example we will create the following views and component:
- Cookbook View (Page View)
- Recipe (Secondary Page View)
Careful planning in this stage will save a lot of time in the long run. After we are done planning the components and sub pages that are required we can move on. Before creating the .NET view, however, we need to create a page type schema within Ingeniux
Creating a page type with Ingeniux
Ingeniux uses XML schemas to represent page types. These XML schemas can use several pre-defined elements built into Ingeniux. To make creating these schemas simple, Ingeniux provides a schema designer tool.
To access the tool, login to Ingeniux and click on ‘Administration’ and then 'Schema Designer' in the left pane.

In the right-hand pane we will see a list of all the current page types in Ingeniux. There are three tabs along the top- 'Page Types,' 'Components,' and 'Inavlid Schemas.'

With the 'Page Types' tab selected, click 'New' in the right-hand pane. Ingeniux will create a new blank page type schema and direct you to the schema editor section. You will be presented with a blank schema which looks like this image

Fill in the schema head section to match the following image. Note that Display Name can be any value but, by convention, Root Name should not contain any spaces. Also note that when we create the C# view, the C# document filename must be exactly the same as the schema root name.

We can now begin adding elements to the schema for our new cookbook page type. Ingeniux users will see these elements as a form when they create or edit the page. Begin by dragging an 'Image' element from the asset panel into the elements section. This image element will allow a user to specify the banner element of the cookbook page. Copy the fields in the following image for the new image element.

On our new cookbook page we want the page creator to be able to enter some custom HTML before the list of recipes. To do this drag the ‘XHTML Editor’ from the asset panel into the elements section. Match the fields for this element with the image bellow:

Next we need to handle the dynamic list of recipes. To do this we will allow the person who creates the page to specify a folder that contains all the recipes. Our page will render all recipes with the folder. Drag the ‘Navigation’ element from the asset panel into the elements section. Match the fields for this element with the image bellow:

By specifying the navigation type as ‘children,’ we are letting Ingeniux know we want a list of all the children of the item the navigation element is pointing at. In our case this will be all the recipes nested in a specified folder.
Next set the export value of the navigation as shown below. To learn more about exports see creating exports.

The last step is to add an element that is common to all page types within Ingeinux on byui.edu. This element is another navigation element called ‘ancestor navigation.’ This element will help us know where exactly our page is in the entire site structure and is used for rendering breadcrumbs. Drag another ‘Navigation’ element from the asset panel into the elements section and match the fields with the following image:

Our new cookbook page type schema is done! Click ‘Save’ -> ‘Save new version.’ to create your schema.
The next step is to create another schema that represents a recipe. To do this click the management tab and highlight our newly created ‘Cookbook’ page then click ‘Copy’ in the right-hand panel. Use the following images as a reference to create the new schema. When you are done click ‘Save’ -> ‘Save new version.’ You can use the 'Delete' button in the right-hand panael to remove elements that are not needed.


After saving the new schema go to your sandbox folder and use the new pagetypes to create the following structure using our new page types:

Go ahead and check out the new pages! There should be an element in each page form the corresponds with a schema element we added. If you try to preview a page you will just see a blank, white page. This is because we have not created the views yet.
Click on the ‘Cookbook’ page and fill in all the content. You can leave ‘Ancestor Navigation’ and ‘View Name’ how they are. For the ‘Recipe Folder’ drag the folder that contains the two recipes into the box.
When you are done click on the ‘XML’ tab. You will see XML that contains the data we entered within the XML structure we specified when we created the schema.

The XML you see here is the same XML we will parse and transform within the view.
Creating a page type with Ingeniux
We are now ready to create our views! Open up your favorite code editor (Visual Studio is great for getting started). Views are written in C# ussing a syntax called Razor.
We will begin by creating the view for the 'Cookbook' page type. First we need to create the actual view file. Navigate to /DSS_Preview/Views/CMSPageDefault/ and create a new file called "Cookbook.cshtml". Remeber the name of the file must match the root element of the XML it transforms exactly.
Paste the following starter code into line 1 of Cookbook.cshtml:
			//Let Ingeniux know this is a page, not a modular element
			@model Ingeniux.Runtime.CMSPageRequest

			//set the rendering start point
			@{
				Layout = "~/Views/Shared/_MainLayout.cshtml";
			}
Note that a full guide of using Razor/C# is not attempted here. Check out W3C for a great guide.
To test that the view is correctly connected with the cookbook schema we created, paste the following code just beneath the code you just entered:
...Hello World
Jump back to ingeniux and preview the cookbook page. You should see a big "Hello World."
Let's add our basic HTML structure. Replace <h1>Hello World</h1> with:
...
Next we need to render the breadcrumb for the page. Luckily this is very simple. All you need to do is include the breadcrumb that has already been created like this:
...@{ //breadcrumbs Html.RenderPartial("PageLayout/Breadcrumb"); }
If we preview the page at this point you will notice the styles look a bit off. This is because we have not flagged the cookbook pagetype as responsive. To flag this page as responsive see flagging a page as responsive.
Next we need to render the banner image at the top of our page. To do this make Cookbook.cshtml look like following:
		@model Ingeniux.Runtime.CMSPageRequest

		@{
			Layout = "~/Views/Shared/_MainLayout.cshtml";

			//grab the banner image source from the XML
			var bannerImageSrc = Model.XPathSelectElement("//BannerImage");
		}


			@{
				//breadcrumbs
				Html.RenderPartial("PageLayout/Breadcrumb");

				//if the banner image source is not null
				if (bannerImageSrc != null)
				{

				}
			}
}
}
An important method we are using in the above code is XPathSelectElement(). This method is used to extract the data from the XML document. For a more detailed description of this and other methods see the methods section.
Now we will render the custom HTML our page creators can insert. To do this we will need to let Ingeniux know to render a string as actual HTML:
		@model Ingeniux.Runtime.CMSPageRequest

		@{
			Layout = "~/Views/Shared/_MainLayout.cshtml";

			//grab the banner image source from the XML
			var bannerImageSrc = Model.XPathSelectElement("//BannerImage");

			//get any custom HTML from the page creator
			var bodyCopy = Model.XPathSelectElement("//BodyCopy");
		}


			@{
				//breadcrumbs
				Html.RenderPartial("PageLayout/Breadcrumb");

				//if the banner image source is not null
				if (bannerImageSrc != null)
				{

				}
			}


					@Html.Raw(bodyCopy.Value)
If you filled in the information in the Cookbook page form in Ingeniux and preview the page, you should now see the image you specified and any text you enetered in the 'Body Copy' section.
We now need to render all the recipes in the 'recipes' folder. For testing purposes make sure the 'Recipe Folder' navigation in your Cookbook page is pointing at the 'Recipes' folder. Click on Recipe 2 and Recipe 1 and fill in all boxes with dummy content. You can leave 'Ancestor Navigation' and 'View Name' alone.
In the following code we grap all the recipes in the specified folder and loop through them. At each iteration of the loop we output a new row which contains the recipe name, description, and a link to the full recipe page.
@model Ingeniux.Runtime.CMSPageRequest
@{
Layout = "~/Views/Shared/_MainLayout.cshtml";
//grab the banner image source from the XML
var bannerImageSrc = Model.XPathSelectElement("//BannerImage");
//get any custom HTML from the page creator
var bodyCopy = Model.XPathSelectElement("//BodyCopy");
//get all recipes in the recipes folder (notice the 's' in the method call)
var recipes = Model.XPathSelectElements("//Navigation[@Name='RecipeFolder']/Page");
}
@{
//breadcrumbs
Html.RenderPartial("PageLayout/Breadcrumb");
//if the banner image source is not null
if (bannerImageSrc != null)
{
}
}
@Html.Raw(bodyCopy.Value)
@{
/*
* loop through all recipes and output the following:
* 1. recipe name
* 2. recipe description
* 3. link to recipe page
*/
foreach(var recipe in recipes)
{
@recipe.GetAttributeValue("Changed")
}
}
Quick Guide
Bellow is a list of common classes, methods, and tasks used in creating views.
Classes
ICMSElement
An object that represents an XML node, its attributes, and all of its children nodes. This object has several useful methods such as XPathSelectElements(), XPathSelectElement(), and GetATtributeValue() (See methods list).
Methods
XPathSelectElement(String xpath)
Parameters: xpath- The xpath path to an XML node.
Returns: The ICMSElement specified by xpath. If no element is found returns null.
Use this method to select XML elements. For example:
			...
			var preCardCode = Model.XPathSelectElement("//NavigationCode");
			...

				@Html.Raw(preCardCode.Value)
XPathSelectElements(String xpath)
Parameters: xpath- The xpath path to an XML node.
Returns: IEnumerable<ICMSElement>- A collection of all elements that xpath selects.
Use this method when you want to select all XML nodes of a certain type.
			...
			var categoryModel = Model.XPathSelectElements("//TaxonomyNavigation[@Name='test']");
			...
			foreach (var category in categoryModel)
			{

					@category.Value

			}
GetAttributeValue(String name)
Parameters: name- The name of the attribute to select.
Returns: string- A string representation of the selected attribute.
Returns the attribute specified by name from an ICMSElement.
			...
			var categoryModel = Model.XPathSelectElement("//TaxonomyNavigation[@Name='test']");
			...

				@categoryModel.GetAttributeValue("height")
Raw(String value)
Parameters: value- The string representation of the HTML to be rendered.
Returns: IHtmlString
Use this method to render HTML rather than output it as special characters. This method uses a helper to render the HTML.
			...
			var categoryModel = Model.XPathSelectElement("//TaxonomyNavigation[@Name='test']");
			...

				@Html.Raw(categoryModel.GetAttributeValue("height"))
Tasks
Creating Exports
When creating multiple views for the same site it is often necessary for pages to share data or create content dynamically based upon other pages in the site. Ingeniux provides three schema elements in the schema designer to handle these situations:
-
Navigation
Use this navigation when users need to specify a folder of pages to be rendered in the view. For an example see the above cookbook example. Another example of this navigation can be found in /Views/CMSPageDefault/Shared/PageLayout/DeptEvents.cshtml
-
Taxonomy Navigation
Use this navigation to select other pages by category (taxonomy). For an example see Views/CMSPageDefault/Shared/PageLayout/CategorizedFilterPage.cshtml
-
Reference Navigation
Use this navigation to select pages that are not in the same taxonomy and are not related by parent, sibling, or child relationships.
Once one of the three above navigations has been added to the schema, the data you want exported needs to be specified. There are a few default exports (name, xid, etc.), but you will need to manually specify any others. In schema designer select the navigation element. The following images illustrates adding exports.
Use the '+' and '-' buttons to add or remove exports. The 'Name' field can by any name and the 'Value' field takes an XPath statement to the data you want to export.
Navigations and exports should be used on the 'one' side of a 'one-to-many' relationship. For example a cookbook contains many recipes. In this case the cookbook would need the navigation and exports to reference the recipies. See the above tutorial for another example.
Flagging a page as responsive
- Open /DSS_Preview/APP_Code/_Functions.cshtml
- Locate the function named isDefaultResponsive
- Add your view name to responsiveViews after all the other add statements like this: responsiveViews.Add("Cookbook");
Misc.
_Functions file
In almost every view you will see a reference to _Functions.MethodName(). This call references a method within the /DSS_Preview/App_Code/_Functions.cshtml file. These methods work like traditional functions. Data can be passed in and a value is returned. This is useful for abstracting common tasks to promote reusability and remove redundancies (i.e. replacing content snippet xids in a string with the actual content snippet value).
Custom methods can be added to the _Functions.cshtml file. Any custom functions added must use the public and static keywords in the function signiture.
_Helpers file
Similar to _Functions, except helpers use the HtmlHelper class to write or print data rather than just returning a value. The _Helpers file is located at /DSS_Preview/App_Code/_Helpers.cshtml
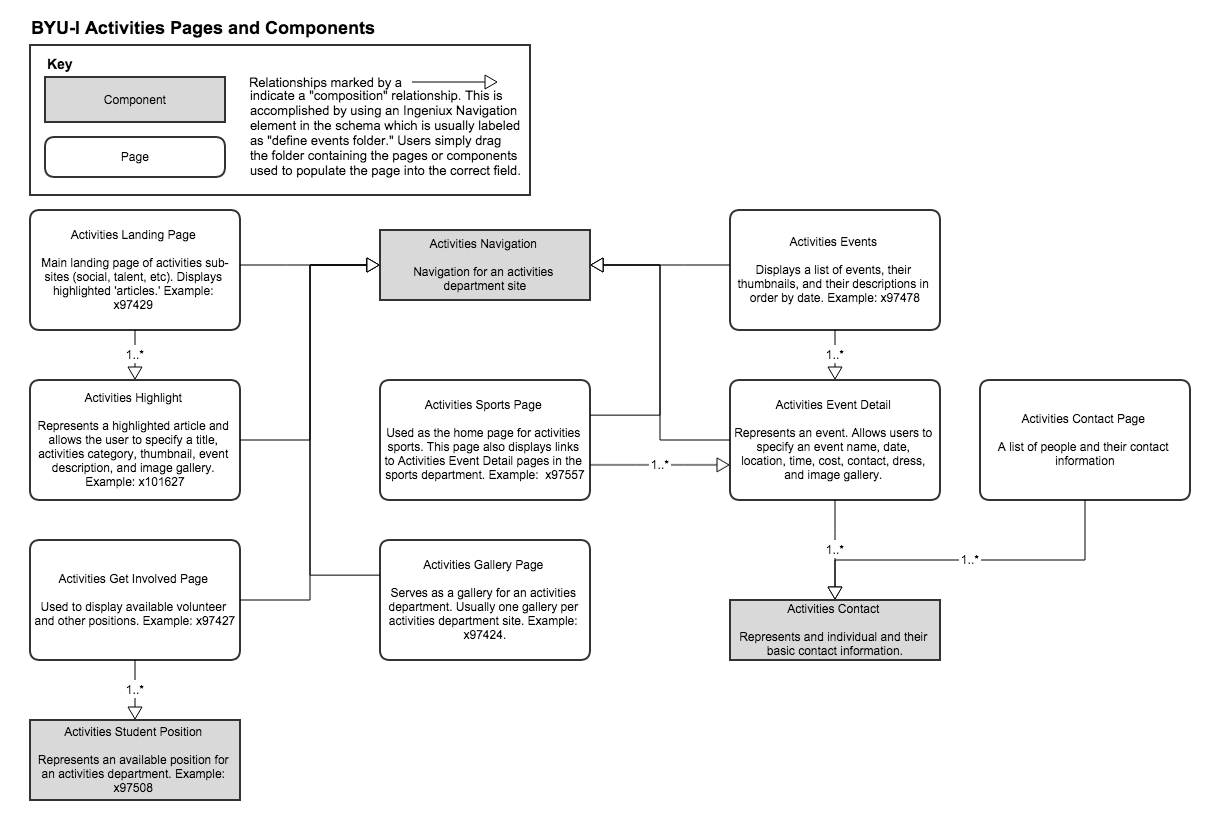
Page Diagrams
Diagrams of a few site pages and components.
Activities
Education Week
